How to understand that it's time to repot a houseplant
Caring for indoor plants may seem like a daunting task, but it's not as difficult as it sounds. One simple step to help keep your houseplants healthy is to repot them. This process will revitalise the soil and provide additional nutrients for the plants.
Also, if the plant is showing signs of outgrowing its current pot, you can repot it into a larger container. Here are a few steps to help you repot your plant with confidence and take care of it like a pro.
Top stories of the day
Read also: For the forgetful: Which indoor plants require the least maintenance
To get started, you'll need newspapers or wax paper, potting mix, scissors, your plants, new pots (if necessary), gloves, and a spade for the soil.
Before repotting a plant, it is important to find out if it is time to do so. In general, if it's been more than a year since the last repotting, if the soil looks depleted or contains too many minerals and salts, or if roots are growing through the drainage holes in the bottom of the pot, it means your plant needs more room to grow and repotting is necessary. If there are no signs of outgrowth, you do not need to move to a larger container. Some plants do well in their current pots and can simply be upgraded by repotting in the same pot.
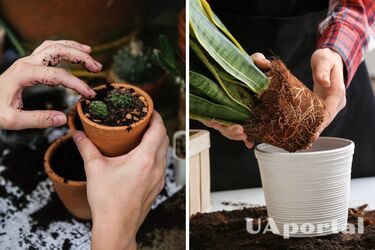
Repotting a plant begins by spreading newspaper or wax paper on the floor to allow for easier clean-up after the procedure. To remove the plant from the pot, hold it at the base of the stem and gently pull it out with the soil, tapping the bottom of the pot to loosen the roots. If the plant is holding on a little, help it free itself by rotating it or shaking it gently. Be patient, especially if the plant is well rooted, and avoid excessive force to avoid damaging the roots.
When the plant is free of the pot, gently untangle the roots with your fingers, separating the fused areas. Remove long, thread-like roots with excessive fusion. If the roots are constricted at the base of the pot, this may be a sign that a larger container is needed. Disentangle the roots carefully, avoiding over-dragging so as not to damage the large roots and prevent the normal movement of water and nutrients to the plant's leaves.
While untangling the roots, a few pieces of earth may accidentally fall off. This is not a problem, and in fact, it is beneficial as you can then remove about a third of the old soil. If the surface of the soil looks impoverished or mineralised, discard it and make room for fresh soil and the nutrients the plant needs to grow. Shake the roots to remove any remaining soil.
After cleaning the root system, add some fresh potting mix to the pot. Return the plant to its place and carefully cover the roots with new soil, gently squeezing but not rubbing the roots with your hands. Do not fill the pot to the very top, leave a small gap to avoid overflowing when watering. Make sure the soil is relaxed enough to allow oxygen to penetrate. Then simply gather up the newspapers or paper that has been lying on the floor and throw it away, and water the plant.
By following the correct repotting procedure, you will ensure the healthy growth and prosperity of your indoor plants. Don't forget about important aspects of care, such as regular watering, adequate lighting, and the right fertiliser for your houseplants. Give them the care of a professional, and they will delight you with their beauty and lively greenery.
To recap, we have already written about what indoor plants you should plant at home
If you want to get the latest news about the war and events in Ukraine, subscribe to our Telegram channel!